Linux文件基本权限
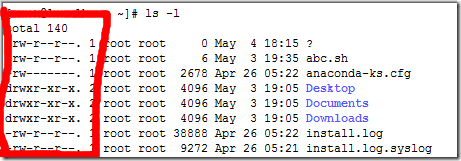
当我们在家目录下运行ls –l命令,会出现一些特别的信息:
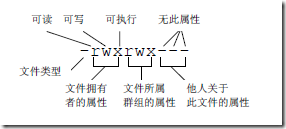
第一个属性代表这个文件是目录、文件或者是连接文件:
d:代表是目录
-:代表是文件
l:代表是链接文件
b:代表是设备文件中可以供存储的接口设备
c:代表是设备文件中的串行端口设备,例如键盘等
然后,rwx都是代表目录权限的:
r:可以对目录执行ls命令,但是不允许使用-l选项,而且不能cd到目录中;
w:可以在目录中创建文件;
x:可以对目录执行ls –l命令,并且能够cd进去。
第一组[rwx]为所有者的权限(owner);第二组[rwx]为群组权限(group);第三组[rwx]为其他用户权限
这是一个文件;
所有者具有的权限是可读可写、不可执行;
群组的权限是可读、不可写不可执行;
其他用户的权限是可读、不可写不可执行。
再来一个例子:drwxr- - r--
这是一个目录文件
所有者的权限是可读可写可执行
群组和其他用户的权限是不可读不可写不可执行。
为什么会是这样呢?
这是一个目录,非root用户不可以进入该目录,无法cd,
因为x与目录的关系相当重要,如果您在该目录下不能执行任何指令,那么自然也就无法执行ls,cd等指令,所以,也就无法进入。因此,请特别注意,如果您想开放某个目录,请记得将该目录的x属性也开放。
权限如此重要,我们如何来进行管理呢?
一、改变群组 chgrp
在lunix系统里,文件或目录的权限的掌控以拥有者及所诉群组来管理。可以使用chgrp指令取变更文件与目录所属群组,这种方式采用群组名称或群组识别码都可以。Chgrp命令就是change group的缩写!要被改变的组名必须要在/etc/group文件内存在才行。
命令格式 :chgrp [选项][组][文件]
命令功能:
chgrp命令可采用群组名称或群组识别码的方式改变文件或目录的所属群组。使用权限是超级用户。
命令参数:
-c 当发生改变时输出调试信息
-f 不显示错误信息
-R 处理指定目录以及其子目录下的所有文件
-v 运行时显示详细的处理信息
使用实例:
实例1:改变文件的群组属性
命令:
chgrp -v bin log2012.log
输出:
[root@localhost test]# ll
---xrw-r-- 1 root root 302108 11-13 06:03 log2012.log
[root@localhost test]# chgrp -v bin log2012.log
“log2012.log” 的所属组已更改为 bin
[root@localhost test]# ll
---xrw-r-- 1 root bin 302108 11-13 06:03 log2012.log
说明:
将log2012.log文件由root群组改为bin群组
实例2:根据指定文件改变文件的群组属性
命令:
chgrp --reference=log2012.log log2013.log
输出:
[root@localhost test]# ll
---xrw-r-- 1 root bin 302108 11-13 06:03 log2012.log
-rw-r--r-- 1 root root 61 11-13 06:03 log2013.log
[root@localhost test]# chgrp --reference=log2012.log log2013.log
[root@localhost test]# ll
---xrw-r-- 1 root bin 302108 11-13 06:03 log2012.log
-rw-r--r-- 1 root bin 61 11-13 06:03 log2013.log
说明:
改变文件log2013.log 的群组属性,使得文件log2013.log的群组属性和参考文件log2012.log的群组属性相同
实例3:改变指定目录以及其子目录下的所有文件的群组属性
命令:
输出:
[root@localhost test]# ll
drwxr-xr-x 2 root root 4096 11-30 08:39 test6
[root@localhost test]# cd test6
[root@localhost test6]# ll
---xr--r-- 1 root root 302108 11-30 08:39 linklog.log
---xr--r-- 1 root root 302108 11-30 08:39 log2012.log
-rw-r--r-- 1 root root 61 11-30 08:39 log2013.log
-rw-r--r-- 1 root root 0 11-30 08:39 log2014.log
-rw-r--r-- 1 root root 0 11-30 08:39 log2015.log
-rw-r--r-- 1 root root 0 11-30 08:39 log2016.log
-rw-r--r-- 1 root root 0 11-30 08:39 log2017.log
[root@localhost test6]# cd ..
[root@localhost test]# chgrp -R bin test6
[root@localhost test]# cd test6
[root@localhost test6]# ll
---xr--r-- 1 root bin 302108 11-30 08:39 linklog.log
---xr--r-- 1 root bin 302108 11-30 08:39 log2012.log
-rw-r--r-- 1 root bin 61 11-30 08:39 log2013.log
-rw-r--r-- 1 root bin 0 11-30 08:39 log2014.log
-rw-r--r-- 1 root bin 0 11-30 08:39 log2015.log
-rw-r--r-- 1 root bin 0 11-30 08:39 log2016.log
-rw-r--r-- 1 root bin 0 11-30 08:39 log2017.log
[root@localhost test6]# cd ..
[root@localhost test]# ll
drwxr-xr-x 2 root bin 4096 11-30 08:39 test6
[root@localhost test]#
说明:
改变指定目录以及其子目录下的所有文件的群组属性
实例4:通过群组识别码改变文件群组属性
命令:
chgrp -R 100 test6
输出:
[root@localhost test]# chgrp -R 100 test6
[root@localhost test]# ll
drwxr-xr-x 2 root users 4096 11-30 08:39 test6
[root@localhost test]# cd test6
[root@localhost test6]# ll
---xr--r-- 1 root users 302108 11-30 08:39 linklog.log
---xr--r-- 1 root users 302108 11-30 08:39 log2012.log
-rw-r--r-- 1 root users 61 11-30 08:39 log2013.log
-rw-r--r-- 1 root users 0 11-30 08:39 log2014.log
-rw-r--r-- 1 root users 0 11-30 08:39 log2015.log
-rw-r--r-- 1 root users 0 11-30 08:39 log2016.log
-rw-r--r-- 1 root users 0 11-30 08:39 log2017.log
二、chown
chown将指定文件的拥有者改为指定的用户或组,用户可以是用户名或者用户ID;组可以是组名或者组ID;文件是以空格分开的要改变权限的文件列表,支持通配符。系统管理员经常使用chown命令,在将文件拷贝到另一个用户的名录下之后,让用户拥有使用该文件的权限。
1.命令格式:
chown [选项]... [所有者][组] 文件...
2.命令功能:
通过chown改变文件的拥有者和群组。在更改文件的所有者或所属群组时,可以使用用户名称和用户识别码设置。普通用户不能将自己的文件改变成其他的拥有者。其操作权限一般为管理员。
3.命令参数:
必要参数:
-c 显示更改的部分的信息
-f 忽略错误信息
-h 修复符号链接
-R 处理指定目录以及其子目录下的所有文件
4.使用实例:
实例1:改变拥有者和群组
命令:
chown mail:mail log2012.log
输出:
[root@localhost test6]# ll
---xr--r-- 1 root users 302108 11-30 08:39 linklog.log
---xr--r-- 1 root users 302108 11-30 08:39 log2012.log
-rw-r--r-- 1 root users 61 11-30 08:39 log2013.log
-rw-r--r-- 1 root users 0 11-30 08:39 log2014.log
-rw-r--r-- 1 root users 0 11-30 08:39 log2015.log
-rw-r--r-- 1 root users 0 11-30 08:39 log2016.log
-rw-r--r-- 1 root users 0 11-30 08:39 log2017.log
[root@localhost test6]# chown mail:mail log2012.log
[root@localhost test6]# ll
---xr--r-- 1 root users 302108 11-30 08:39 linklog.log
---xr--r-- 1 mail mail 302108 11-30 08:39 log2012.log
-rw-r--r-- 1 root users 61 11-30 08:39 log2013.log
-rw-r--r-- 1 root users 0 11-30 08:39 log2014.log
-rw-r--r-- 1 root users 0 11-30 08:39 log2015.log
-rw-r--r-- 1 root users 0 11-30 08:39 log2016.log
-rw-r--r-- 1 root users 0 11-30 08:39 log2017.log
[root@localhost test6]#
说明:
实例2:改变文件拥有者和群组
命令:
chown root: log2012.log
输出:
[root@localhost test6]# ll
总计 604
---xr--r-- 1 root users 302108 11-30 08:39 linklog.log
---xr--r-- 1 mail mail  302108 11-30 08:39 log2012.log
-rw-r--r-- 1 root users     61 11-30 08:39 log2013.log
-rw-r--r-- 1 root users      0 11-30 08:39 log2014.log
-rw-r--r-- 1 root users      0 11-30 08:39 log2015.log
-rw-r--r-- 1 root users      0 11-30 08:39 log2016.log
-rw-r--r-- 1 root users      0 11-30 08:39 log2017.log
[root@localhost test6]# chown root: log2012.log
[root@localhost test6]# ll
总计 604
---xr--r-- 1 root users 302108 11-30 08:39 linklog.log
---xr--r-- 1 root root  302108 11-30 08:39 log2012.log
-rw-r--r-- 1 root users     61 11-30 08:39 log2013.log
-rw-r--r-- 1 root users      0 11-30 08:39 log2014.log
-rw-r--r-- 1 root users      0 11-30 08:39 log2015.log
-rw-r--r-- 1 root users      0 11-30 08:39 log2016.log
-rw-r--r-- 1 root users      0 11-30 08:39 log2017.log
[root@localhost test6]#
说明:
实例3:改变文件群组
命令:
chown :mail log2012.log
输出:
[root@localhost test6]# ll
总计 604
---xr--r-- 1 root users 302108 11-30 08:39 linklog.log
---xr--r-- 1 root root  302108 11-30 08:39 log2012.log
-rw-r--r-- 1 root users     61 11-30 08:39 log2013.log
-rw-r--r-- 1 root users      0 11-30 08:39 log2014.log
-rw-r--r-- 1 root users      0 11-30 08:39 log2015.log
-rw-r--r-- 1 root users      0 11-30 08:39 log2016.log
-rw-r--r-- 1 root users      0 11-30 08:39 log2017.log
[root@localhost test6]# chown :mail log2012.log
[root@localhost test6]# ll
总计 604
---xr--r-- 1 root users 302108 11-30 08:39 linklog.log
---xr--r-- 1 root mail  302108 11-30 08:39 log2012.log
-rw-r--r-- 1 root users     61 11-30 08:39 log2013.log
-rw-r--r-- 1 root users      0 11-30 08:39 log2014.log
-rw-r--r-- 1 root users      0 11-30 08:39 log2015.log
-rw-r--r-- 1 root users      0 11-30 08:39 log2016.log
-rw-r--r-- 1 root users      0 11-30 08:39 log2017.log
说明:
实例4:改变指定目录以及其子目录下的所有文件的拥有者和群组
命令:
chown -R -v root:mail test6
输出:
[root@localhost test]# ll
drwxr-xr-x 2 root users   4096 11-30 08:39 test6
[root@localhost test]# chown -R -v root:mail test6
“test6/log2014.log” 的所有者已更改为 root:mail
“test6/linklog.log” 的所有者已更改为 root:mail
“test6/log2015.log” 的所有者已更改为 root:mail
“test6/log2013.log” 的所有者已更改为 root:mail
“test6/log2012.log” 的所有者已保留为 root:mail
“test6/log2017.log” 的所有者已更改为 root:mail
“test6/log2016.log” 的所有者已更改为 root:mail
“test6” 的所有者已更改为 root:mail
[root@localhost test]# ll
drwxr-xr-x 2 root mail   4096 11-30 08:39 test6
[root@localhost test]# cd test6
[root@localhost test6]# ll
总计 604
---xr--r-- 1 root mail 302108 11-30 08:39 linklog.log
---xr--r-- 1 root mail 302108 11-30 08:39 log2012.log
-rw-r--r-- 1 root mail     61 11-30 08:39 log2013.log
-rw-r--r-- 1 root mail      0 11-30 08:39 log2014.log
-rw-r--r-- 1 root mail      0 11-30 08:39 log2015.log
-rw-r--r-- 1 root mail      0 11-30 08:39 log2016.log
-rw-r--r-- 1 root mail      0 11-30 08:39 log2017.log
三chmod
chmod命令用于改变linux系统文件或目录的访问权限。用它控制文件或目录的访问权限。该命令有两种用法。一种是包含字母和操作符表达式的文字设定法;另一种是包含数字的数字设定法。
Linux系统中的每个文件和目录都有访问许可权限,用它来确定谁可以通过何种方式对文件和目录进行访问和操作。
文件或目录的访问权限分为只读,只写和可执行三种。以文件为例,只读权限表示只允许读其内容,而禁止对其做任何的更改操作。可执行权限表示允许将该文件作为一个程序执行。文件被创建时,文件所有者自动拥有对该文件的读、写和可执行权限,以便于对文件的阅读和修改。用户也可根据需要把访问权限设置为需要的任何组合。
有三种不同类型的用户可对文件或目录进行访问:文件所有者,同组用户、其他用户。所有者一般是文件的创建者。所有者可以允许同组用户有权访问文件,还可以将文件的访问权限赋予系统中的其他用户。在这种情况下,系统中每一位用户都能访问该用户拥有的文件或目录。
每一文件或目录的访问权限都有三组,每组用三位表示,分别为文件属主的读、写和执行权限;与属主同组的用户的读、写和执行权限;系统中其他用户的读、写和执行权限。当用ls -l命令显示文件或目录的详细信息时,最左边的一列为文件的访问权限。 例如:
命令:
ls -al
输出:
[root@localhost test]# ll -al
总计 316lrwxrwxrwx 1 root root 11 11-22 06:58 linklog.log -> log2012.log
-rw-r--r-- 1 root root 302108 11-13 06:03 log2012.log
-rw-r--r-- 1 root root 61 11-13 06:03 log2013.log
-rw-r--r-- 1 root root 0 11-13 06:03 log2014.log
-rw-r--r-- 1 root root 0 11-13 06:06 log2015.log
-rw-r--r-- 1 root root 0 11-16 14:41 log2016.log
-rw-r--r-- 1 root root 0 11-16 14:43 log2017.log
我们以log2012.log为例:
-rw-r--r-- 1 root root 296K 11-13 06:03 log2012.log
第一列共有10个位置,第一个字符指定了文件类型。在通常意义上,一个目录也是一个文件。如果第一个字符是横线,表示是一个非目录的文件。如果是d,表示是一个目录。从第二个字符开始到第十个共9个字符,3个字符一组,分别表示了3组用户对文件或者目录的权限。权限字符用横线代表空许可,r代表只读,w代表写,x代表可执行。
例如:
- rw- r-- r--
表示log2012.log是一个普通文件;log2012.log的属主有读写权限;与log2012.log属主同组的用户只有读权限;其他用户也只有读权限。
确定了一个文件的访问权限后,用户可以利用Linux系统提供的chmod命令来重新设定不同的访问权限。也可以利用chown命令来更改某个文件或目录的所有者。利用chgrp命令来更改某个文件或目录的用户组。
chmod命令是非常重要的,用于改变文件或目录的访问权限。用户用它控制文件或目录的访问权限。chmod命令详细情况如下。
1. 命令格式:
chmod [-cfvR] [--help] [--version] mode file
2. 命令功能:
用于改变文件或目录的访问权限,用它控制文件或目录的访问权限。
3. 命令参数:
必要参数:
-c 当发生改变时,报告处理信息
-f 错误信息不输出
-R 处理指定目录以及其子目录下的所有文件
-v 运行时显示详细处理信息
选择参数:
--reference=<目录或者文件> 设置成具有指定目录或者文件具有相同的权限
--version 显示版本信息
<权限范围>+<权限设置> 使权限范围内的目录或者文件具有指定的权限
<权限范围>-<权限设置> 删除权限范围的目录或者文件的指定权限
<权限范围>=<权限设置> 设置权限范围内的目录或者文件的权限为指定的值
权限范围:
u :目录或者文件的当前的用户
g :目录或者文件的当前的群组
o :除了目录或者文件的当前用户或群组之外的用户或者群组
a :所有的用户及群组
权限代号:
r :读权限,用数字4表示
w :写权限,用数字2表示
x :执行权限,用数字1表示
- :删除权限,用数字0表示
s :特殊权限
该命令有两种用法。一种是包含字母和操作符表达式的文字设定法;另一种是包含数字的数字设定法。
1). 文字设定法:
chmod [who] [+ | - | =] [mode] 文件名
2). 数字设定法
我们必须首先了解用数字表示的属性的含义:0表示没有权限,1表示可执行权限,2表示可写权限,4表示可读权限,然后将其相加。所以数字属性的格式应为3个从0到7的八进制数,其顺序是(u)(g)(o)。
例如,如果想让某个文件的属主有“读/写”二种权限,需要把4(可读)+2(可写)=6(读/写)。
数字设定法的一般形式为:
chmod [mode] 文件名
数字与字符对应关系如下:
r=4,w=2,x=1
若要rwx属性则4+2+1=7
若要rw-属性则4+2=6;
若要r-x属性则4+1=7。
4. 使用实例:
实例1:增加文件所有用户组可执行权限
命令:
chmod a+x log2012.log
输出:
[root@localhost test]# ls -al log2012.log
-rw-r--r-- 1 root root 302108 11-13 06:03 log2012.log
[root@localhost test]# chmod a+x log2012.log
[root@localhost test]# ls -al log2012.log
-rwxr-xr-x 1 root root 302108 11-13 06:03 log2012.log
[root@localhost test]#
说明:
即设定文件log2012.log的属性为:文件属主(u) 增加执行权限;与文件属主同组用户(g) 增加执行权限;其他用户(o) 增加执行权限。
实例2:同时修改不同用户权限
命令:
chmod ug+w,o-x log2012.log
输出:
[root@localhost test]# ls -al log2012.log
-rwxr-xr-x 1 root root 302108 11-13 06:03 log2012.log
[root@localhost test]# chmod ug+w,o-x log2012.log
[root@localhost test]# ls -al log2012.log
-rwxrwxr-- 1 root root 302108 11-13 06:03 log2012.log
说明:
即设定文件text的属性为:文件属主(u) 增加写权限;与文件属主同组用户(g) 增加写权限;其他用户(o) 删除执行权限
实例3:删除文件权限
命令:
chmod a-x log2012.log
输出:
[root@localhost test]# ls -al log2012.log
-rwxrwxr-- 1 root root 302108 11-13 06:03 log2012.log
[root@localhost test]# chmod a-x log2012.log
[root@localhost test]# ls -al log2012.log
-rw-rw-r-- 1 root root 302108 11-13 06:03 log2012.log
说明:
删除所有用户的可执行权限
实例4:使用“=”设置权限
命令:
chmod u=x log2012.log
输出:
[root@localhost test]# ls -al log2012.log
-rw-rw-r-- 1 root root 302108 11-13 06:03 log2012.log
[root@localhost test]# chmod u=x log2012.log
[root@localhost test]# ls -al log2012.log
---xrw-r-- 1 root root 302108 11-13 06:03 log2012.log
说明:
撤销原来所有的权限,然后使拥有者具有可读权限
实例5:对一个目录及其子目录所有文件添加权限
命令:
chmod -R u+x test4
输出:
[root@localhost test]# cd test4
[root@localhost test4]# ls -al
总计 312drwxrwxr-x 2 root root 4096 11-13 05:50 .
drwxr-xr-x 5 root root 4096 11-22 06:58 ..
-rw-r--r-- 1 root root 302108 11-12 22:54 log2012.log
-rw-r--r-- 1 root root 61 11-12 22:54 log2013.log
-rw-r--r-- 1 root root 0 11-12 22:54 log2014.log
[root@localhost test4]# cd ..
[root@localhost test]# chmod -R u+x test4
[root@localhost test]# cd test4
[root@localhost test4]# ls -al
总计 312drwxrwxr-x 2 root root 4096 11-13 05:50 .
drwxr-xr-x 5 root root 4096 11-22 06:58 ..
-rwxr--r-- 1 root root 302108 11-12 22:54 log2012.log
-rwxr--r-- 1 root root 61 11-12 22:54 log2013.log
-rwxr--r-- 1 root root 0 11-12 22:54 log2014.log
说明:
递归地给test4目录下所有文件和子目录的属主分配权限
其他一些实例:
1).
命令:
chmod 751 file
说明:
给file的属主分配读、写、执行(7)的权限,给file的所在组分配读、执行(5)的权限,给其他用户分配执行(1)的权限
2).
命令:
chmod u=rwx,g=rx,o=x file
说明:
上例的另一种形式
3).
命令
chmod =r file
说明:
为所有用户分配读权限
3).
命令:
chmod 444 file
说明:
同上例
4).
命令:
chmod a-wx,a+r file
说明:
同上例
郑重声明:本站内容如果来自互联网及其他传播媒体,其版权均属原媒体及文章作者所有。转载目的在于传递更多信息及用于网络分享,并不代表本站赞同其观点和对其真实性负责,也不构成任何其他建议。


