多点IPsecVPN和NAT-T穿越的实现
实验
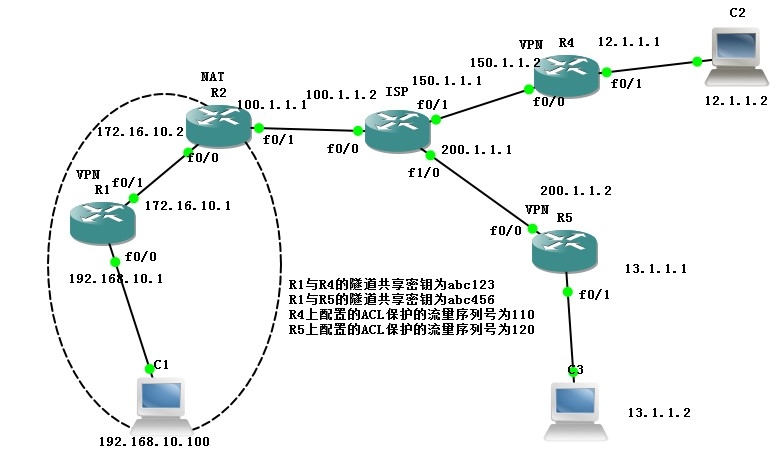
实验拓扑图:
实验环境:
在GNS3上面搭建五台路由器和三台PC机,R1,R4,R5作为VPN路由器,R2作为NAT地址转换路由器,ISP路由器作为运营商,使用VPCS模拟PC机客户端
实验要求:
配置多点IPsecVPN,实现C1能访问C2和C3,在NAT地址转换的环境下配置NAT-T,使外网的可以发起VPN隧道连接。
实验步骤:
配置各路由器接口和PC机IP地址:
R1:
R1(config)#int f0/0
R1(config-if)#ip add 192.168.10.1 255.255.255.0
R1(config-if)#no shu
R1(config-if)#int f0/1
R1(config-if)#ip add 172.16.10.1 255.255.255.0
R1(config-if)#no shut
R2:
R2(config)#int f0/0
R2(config-if)#ip add 172.16.10.2 255.255.255.0
R2(config-if)#no shut
R2(config-if)#int f0/1
R2(config-if)#ip add 100.1.1.1 255.255.255.252
R2(config-if)#no shut
ISP:
R3(config)#int f0/0
R3(config-if)#ip add 100.1.1.2 255.255.255.252
R3(config-if)#no shut
R3(config-if)#int f0/1
R3(config-if)#ip add 150.1.1.1 255.255.255.252
R3(config-if)#no shut
R4:
R4(config)#int f0/0
R4(config-if)#ip add 150.1.1.2 255.255.255.252
R4(config-if)#no shut
R4(config-if)#int f0/1
R4(config-if)#ip add 12.1.1.1 255.255.255.0
R4(config-if)#no shut
R5:
R5(config)#int f0/0
R5(config-if)#ip add 200.1.1.2 255.255.255.252
R5(config-if)#no shut
R5(config-if)#int f0/1
R5(config-if)#ip add 13.1.1.1 255.255.255.0
R5(config-if)#no shut
PC:
配置默认路由:
R1(config)#ip route 0.0.0.0 0.0.0.0 172.16.10.2
R2(config)#ip route 0.0.0.0 0.0.0.0 100.1.1.2
R4(config)#ip route 0.0.0.0 0.0.0.0 150.1.1.1
R5(config)#ip route 0.0.0.0 0.0.0.0 200.1.1.1
接下来配置IPsecVPN:
R1到R4之间的VPN隧道:
R1(config)#crypto isakmp policy 1
R1(config-isakmp)#encryption des
R1(config-isakmp)#authentication pre-share
R1(config-isakmp)#hash sha
R1(config-isakmp)#group 2
R1(config-isakmp)#lifetime 60
R1(config-isakmp)#ex
R1(config)#crypto isakmp key 0 abc123 address 150.1.1.2
R1(config)#access-list 110 permit ip 192.168.10.0 0.0.0.255 12.1.1.0 0.0.0.255
R1(config)#crypto ipsec transform-set benet esp-des esp-sha-hmac
R1(cfg-crypto-trans)#ex
R1(config)#crypto map benetmap 1 ipsec-isakmp
R1(config-crypto-map)#set peer 150.1.1.2
R1(config-crypto-map)#set transform-set benet
R1(config-crypto-map)#match address 110
R1(config-crypto-map)#ex
R1(config)#int f0/1
R1(config-if)#crypto map benetmap
配置实现多点IPsecVPN:
在R1上建立与R5的共享密钥和保护流量的ACL,还需要建立新的crypto map:
R1(config)#crypto isakmp key 0 abc123 address 150.1.1.2
R1(config)#access-list 110 permit ip 192.168.10.0 0.0.0.255 12.1.1.0 0.0.0.255
R1(config)#crypto map benetmap 2 ipsec-isakmp //使用相同的映射名称,但序列号不同
R1(config-crypto-map)#set peer 200.1.1.2
R1(config-crypto-map)#set transform-set benet
R1(config-crypto-map)#match address 120
R4的隧道配置:
R4(config)#crypto isakmp policy 1
R4(config-isakmp)#authentication pre-share
R4(config-isakmp)#hash sha
R4(config-isakmp)#group 2
R4(config-isakmp)#lifetime 60
R4(config-isakmp)#ex
R4(config)#crypto isakmp key 0 abc123 address 100.1.1.1
R4(config)#access-list 110 permit ip 12.1.1.0 0.0.0.255 192.168.10.0 0.0.0.255
R4(config)#crypto ipsec transform-set benet esp-des esp-sha-hmac
R4(cfg-crypto-trans)#ex
R4(config)#crypto map benetmap 1 ipsec-isakmp
R4(config-crypto-map)#set peer 100.1.1.1
R4(config-crypto-map)#set transform-set benet
R4(config-crypto-map)#match address 110
R4(config-crypto-map)#ex
R4(config)#int f0/0
R4(config-if)#crypto map benetmap
R5的隧道配置:
R5(config)#crypto isakmp policy 1
R5(config-isakmp)#encryption des
R5(config-isakmp)#authentication pre-share
R5(config-isakmp)#hash sha
R5(config-isakmp)#group 2
R5(config-isakmp)#lifetime 60
R5(config-isakmp)#ex
R5(config)#crypto isakmp key 0 abc456 address 100.1.1.1
R5(config)#access-list 120 permit ip 13.1.1.0 0.0.0.255 192.168.10.0 0.0.0.255
R5(config)#crypto ipsec transform-set benet esp-des esp-sha-hmac
R5(cfg-crypto-trans)#ex
R5(config)#crypto map benetmap 2 ipsec-isakmp
R5(config-crypto-map)#set peer 100.1.1.1
R5(config-crypto-map)#set transform-set benet
R5(config-crypto-map)#match address 120
R5(config-crypto-map)#ex
R5(config)#int f0/0
R5(config-if)#crypto map benetmap
在NAT路由器上做NAT-T穿越:
NAT-T在阶段一建立过中检测对等体之间是否存在地址转换设备,如果有,会在后续数据包中的IP包头和ESP包头之间插入一个标准的UDP包头。
R2(config)#ip nat inside source list 1 interface f0/1 overload //作一条PAT转换私有地址
R2(config)#ip nat inside source static udp 172.16.10.1 500 100.1.1.1 500 //配置管理连接的静态端口映射
R2(config)#ip nat inside source static udp 172.16.10.1 4500 100.1.1.1 4500 //配置数据连接的静态端口映射
测试C1与C2和C3通信:
实验完成
本文出自 “共同努力,共同进步~~” 博客,请务必保留此出处http://9067358.blog.51cto.com/9057358/1630174
郑重声明:本站内容如果来自互联网及其他传播媒体,其版权均属原媒体及文章作者所有。转载目的在于传递更多信息及用于网络分享,并不代表本站赞同其观点和对其真实性负责,也不构成任何其他建议。


