Centos6.4下快速构建基于用户名密码验证的openvpn服务器
如今VPN应用已经非常广泛了,之前就写过一篇关于PPTPD的博文。链接是http://cyr520.blog.51cto.com/714067/1161788。
家里最近新换了一个宽带。居然没办法用拨上公司的PptpdVPN,一直拨号状态一直停留在正在验证用户名和密码这一步。百度谷歌了一大圈,也没解决这个问题。貌似是因为宽带运营商屏蔽GRE协议的原因。作为运维人员,不能及时的连上公司的内部网络是一件很让人不爽的事情。
干脆再搞一套OpenVPN吧,据说OpenVPN非常强大,可以适应很复杂的网络环境,并且配置也非常灵活。
服务端系统环境:
1、Centos6.4 x86_64
2、单网卡
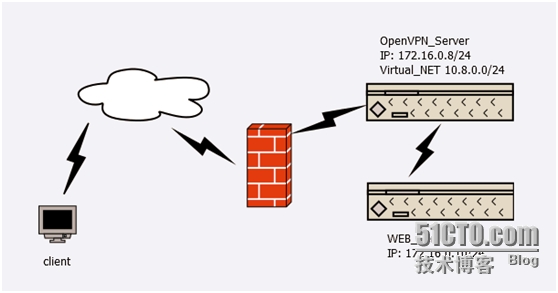
网络架构:
环境说明:OpenVPN采用公司内网的一台单网卡服务器部署,通过路由器做端口映射到外网,客户端连上VPN服务器需要实现能连上公司内部的其他服务器。
安装方法分两种,编译安装和使用YUM安装,因为本文讲的是快速构建,所以使用YUM来安装。
服务端操作步骤:
添加EPEL仓库:
yum install http://mirrors.zju.edu.cn/epel/6/i386/epel-release-6-8.noarch.rpm
安装OpenVPN:
yum install openvpn -y
下载密钥制作工具easy_rsa 2:
wget https://github.com/OpenVPN/easy-rsa/archive/release/2.x.zip
解压easy_rsa并拷贝到/etc/openvpn:
unzip 2.x.zip
mv easy-rsa-release-2.x/ /etc/openvpn/
cd /etc/openvpn/easy-rsa-release-2.x/easy-rsa/2.0
vim vars
export KEY_COUNTRY="CN"
export KEY_PROVINCE="BEIJING"
export KEY_CITY="BEIJING"
export KEY_ORG="XIAOCUI"
export KEY_EMAIL="[email protected]"
export KEY_OU="MyOpenVPN"
编辑完之后,保存退出。
将刚才编辑的vars文件,执行如下命令:
source vars
./clean-all
./build-ca
创建服务器的证书和密钥:
./build-key-server OpenVPN_Server
[root@cloud 2.0]# ./build-key-server OpenVPN_Server
Generating a 2048 bit RSA private key
.................................+++
............+++
writing new private key to ‘OpenVPN_Server.key‘
-----
You are about to be asked to enter information that will be incorporated
into your certificate request.
What you are about to enter is what is called a Distinguished Name or a DN.
There are quite a few fields but you can leave some blank
For some fields there will be a default value,
If you enter ‘.‘, the field will be left blank.
-----
Country Name (2 letter code) [CN]:
State or Province Name (full name) [BEIJING]:
Locality Name (eg, city) [BEIJING]:
Organization Name (eg, company) [XIAOCUI]:
Organizational Unit Name (eg, section) [MyOpenVPN]:
Common Name (eg, your name or your server‘s hostname) [OpenVPN_Server]:
Name [EasyRSA]:
Email Address [ADMIN@ XIAOCUI.COM]:
Please enter the following ‘extra‘ attributes
to be sent with your certificate request
A challenge password []:
An optional company name []:
Using configuration from /etc/openvpn/easy-rsa-release-2.x/easy-rsa/2.0/openssl-1.0.0.cnf
Check that the request matches the signature
Signature ok
The Subject‘s Distinguished Name is as follows
countryName :PRINTABLE:‘CN‘
stateOrProvinceName :PRINTABLE:‘BEIJING‘
localityName :PRINTABLE:‘BEIJING‘
organizationName :PRINTABLE:‘ XIAOCUI ‘
organizationalUnitName:PRINTABLE:‘MyOpenVPN‘
commonName :T61STRING:‘OpenVPN_Server‘
name :PRINTABLE:‘EasyRSA‘
emailAddress :IA5STRING:‘ADMIN@ XIAOCUI.COM‘
Certificate is to be certified until May 2 07:49:13 2025 GMT (3650 days)
Sign the certificate? [y/n]:y
1 out of 1 certificate requests certified, commit? [y/n]y
Write out database with 1 new entries
Data Base Updated
创建客户端的证书和密钥:
[root@cloud 2.0]# ./build-key client-user-test1
Generating a 2048 bit RSA private key
....................+++
...............................................................................+++
writing new private key to ‘client-user-cuiyuanrong.key‘
-----
You are about to be asked to enter information that will be incorporated
into your certificate request.
What you are about to enter is what is called a Distinguished Name or a DN.
There are quite a few fields but you can leave some blank
For some fields there will be a default value,
If you enter ‘.‘, the field will be left blank.
-----
Country Name (2 letter code) [CN]:
State or Province Name (full name) [BEIJING]:
Locality Name (eg, city) [BEIJING]:
Organization Name (eg, company) [XIAOCUI]:
Organizational Unit Name (eg, section) [MyOpenVPN]:
Common Name (eg, your name or your server‘s hostname) [client-user-test1]:
Name [EasyRSA]:
Email Address [[email protected]]:
Please enter the following ‘extra‘ attributes
to be sent with your certificate request
A challenge password []:
An optional company name []:
Using configuration from /etc/openvpn/easy-rsa-release-2.x/easy-rsa/2.0/openssl-1.0.0.cnf
Check that the request matches the signature
Signature ok
The Subject‘s Distinguished Name is as follows
countryName :PRINTABLE:‘CN‘
stateOrProvinceName :PRINTABLE:‘BEIJING‘
localityName :PRINTABLE:‘BEIJING‘
organizationName :PRINTABLE:‘XIAOCUI‘
organizationalUnitName:PRINTABLE:‘MyOpenVPN‘
commonName :PRINTABLE:‘client-user-test1‘
name :PRINTABLE:‘EasyRSA‘
emailAddress :IA5STRING:‘[email protected]‘
Certificate is to be certified until May 2 07:53:17 2025 GMT (3650 days)
Sign the certificate? [y/n]:y
1 out of 1 certificate requests certified, commit? [y/n]y
Write out database with 1 new entries
Data Base Updated
创建Diffie Hellman 参数:
./build-dh
创建OpenVPN服务端配置文件:
cd /etc/openvpn/
vim server.conf
local 0.0.0.0
port 1194
proto tcp
dev tun
ca /etc/openvpn/easy-rsa-release-2.x/easy-rsa/2.0/keys/ca.crt
cert /etc/openvpn/easy-rsa-release-2.x/easy-rsa/2.0/keys/OpenVPN_Server.crt
key /etc/openvpn/easy-rsa-release-2.x/easy-rsa/2.0/keys/OpenVPN_Server.key
dh /etc/openvpn/easy-rsa-release-2.x/easy-rsa/2.0/keys/dh2048.pem
server 10.8.0.0 255.255.255.0
ifconfig-pool-persist /var/log/openvpn/ipp.txt
push "route 10.0.0.0 255.255.255.0"
client-to-client
keepalive 10 120
comp-lzo
persist-key
persist-tun
status openvpn-status.log
log /var/log/openvpn.log
log-append /var/log/openvpn.log
verb 3
script-security 3 system
auth-user-pass-verify /etc/openvpn/checkpsw.sh via-env
client-cert-not-required
username-as-common-name
创建checkpsw.sh脚本:
cd /etc/openvpn
vim checkpsw.sh
#!/bin/sh
###########################################################
# checkpsw.sh (C) 2004 Mathias Sundman <[email protected]>
#
# This script will authenticate OpenVPN users against
# a plain text file. The passfile should simply contain
# one row per user with the username first followed by
# one or more space(s) or tab(s) and then the password.
PASSFILE="/etc/openvpn/psw-file"
LOG_FILE="/var/log/openvpn/openvpn-password.log"
TIME_STAMP=`date "+%Y-%m-%d %T"`
###########################################################
if [ ! -r "${PASSFILE}" ]; then
echo "${TIME_STAMP}: Could not open password file \"${PASSFILE}\" for reading." >> ${LOG_FILE}
exit 1
fi
CORRECT_PASSWORD=`awk ‘!/^;/&&!/^#/&&$1=="‘${username}‘"{print $2;exit}‘ ${PASSFILE}`
if [ "${CORRECT_PASSWORD}" = "" ]; then
echo "${TIME_STAMP}: User does not exist: username=\"${username}\", password=\"${password}\"." >> ${LOG_FILE}
exit 1
fi
if [ "${password}" = "${CORRECT_PASSWORD}" ]; then
echo "${TIME_STAMP}: Successful authentication: username=\"${username}\"." >> ${LOG_FILE}
exit 0
fi
echo "${TIME_STAMP}: Incorrect password: username=\"${username}\", password=\"${password}\"." >> ${LOG_FILE}
exit 1
chmod +x checkpsw.sh
创建psw-file文件:
cd /etc/openvpn
echo "test1 test1" > psw-file
chmod 400 psw-file
加入开机启动项:
chkconfig openvpn on
启动openvpn服务端:
/etc/init.d/openvpn start
打包客户端需要的证书和密钥:
cd /etc/openvpn/easy-rsa-release-2.x/easy-rsa/2.0/keys/
tar zcvf ca.crt client-user-test1.*
防火墙策略
cat /etc/sysconfig/iptables
# Generated by iptables-save v1.4.7 on Tue May 5 11:25:43 2015
*nat
:PREROUTING ACCEPT [74:10890]
:POSTROUTING ACCEPT [1:156]
:OUTPUT ACCEPT [1:156]
-A POSTROUTING -s 10.8.0.0/24 -o eth0 -j MASQUERADE
COMMIT
# Completed on Tue May 5 11:25:43 2015
# Generated by iptables-save v1.4.7 on Tue May 5 11:25:43 2015
*filter
:INPUT ACCEPT [0:0]
:FORWARD ACCEPT [0:0]
:OUTPUT ACCEPT [24:3392]
-A INPUT -i lo -j ACCEPT
-A INPUT -p icmp -m icmp --icmp-type any -j ACCEPT
-A INPUT -m state --state RELATED,ESTABLISHED -j ACCEPT
-A INPUT -s 10.8.0.0/24 -j ACCEPT
-A INPUT -p tcp -m state --state NEW -m tcp --dport 22 -j ACCEPT
-A INPUT -p tcp -m state --state NEW -m tcp --dport 1194 -j ACCEPT
-A INPUT -p udp -m state --state NEW -m udp --dport 1194 -j ACCEPT
-A INPUT -i tun+ -j ACCEPT
-A FORWARD -d 10.8.0.0/24 -j ACCEPT
-A FORWARD -i tun+ -j ACCEPT
-A INPUT -j DROP
COMMIT
# Completed on Tue May 5 11:25:43 2015
客户端已windows为例:
客户端操作步骤:
下载windows客户端:
http://openvpn.ustc.edu.cn/openvpn-install-2.3.6-I603-x86_64.exe
安装好客户端软件之后,把之前从服务端打包的客户端需要的证书解压到客户端安装目录下的config目录中。
并且创建客户端配置文件:
client.ovpn
client
dev tun
proto tcp
remote 115.183.9.106 1194
nobind
user nobody
group nobody
persist-key
persist-tun
ca ca.crt
;cert client-user-test1.crt
;key client-user-test1.key
comp-lzo
verb 3
auth-user-pass
reneg-sec 360000
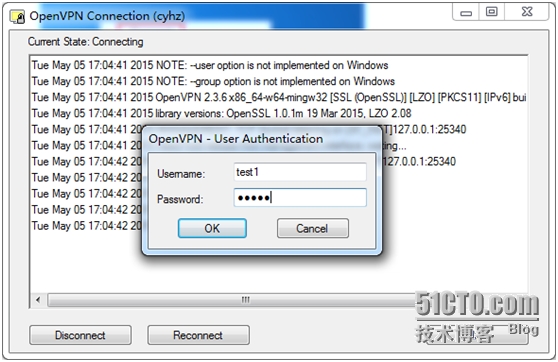
测试连接:
到此基于用户名密码的验证方式就部署好了,需要单独证书验证或证书和密码组合验证的,请参考网上其它教程,实际上只需要在客户端和服务端的两个配置文件稍微做下调整即可。
本文出自 “小崔的成长之路” 博客,请务必保留此出处http://cyr520.blog.51cto.com/714067/1650633
郑重声明:本站内容如果来自互联网及其他传播媒体,其版权均属原媒体及文章作者所有。转载目的在于传递更多信息及用于网络分享,并不代表本站赞同其观点和对其真实性负责,也不构成任何其他建议。


