
[Android]继承式UI界面布局设计
一般而言,Android界面布局使用聚合的方式比较多,这种方式要求首先构建一批能够复用的组件,然后在Activity的布局文件中进行聚合。尽管这种方式能够完成组件的复用,但如果这些组件在不同Activity中的布局有很多相同点的时候,也还是会带来很大程度的冗余(代码)。本文介绍一种比聚合更加有效的界面布局方式——继承式布局。
对于类的继承和对象的聚合之间有哪些相同点和不同点,分别适用于哪种场景,相信大家已经深有体会。在此就不多讲了。其实类比过来,Android的界面布局也是如此。假设我们需要实现如下的三种布局:


每一个布局都是在前一个布局的基础上增加自己的元素。这种形式多么像类的继承呀!下面列出实现文件:
page_three_parts.xml
<?xml version="1.0" encoding="utf-8"?>
<RelativeLayout xmlns:android="http://schemas.android.com/apk/res/android"
    android:id="@+id/page_three_parts_root_layout"
    android:layout_width="match_parent"
    android:layout_height="match_parent" >

    <RelativeLayout
        android:layout_width="match_parent"
        android:layout_height="96dp"
        android:layout_alignParentTop="true"
        android:background="@color/main_blue" >

        <ImageView
            android:id="@+id/image_logo"
            android:layout_width="120dp"
            android:layout_height="80dp"
            android:layout_alignParentLeft="true"
            android:layout_alignParentTop="true"
            android:layout_margin="10dp"
            android:gravity="center"
            android:src="@drawable/logo" />
    </RelativeLayout>

    <RelativeLayout
        android:layout_width="match_parent"
        android:layout_height="96dp"
        android:layout_alignParentBottom="true"
        android:background="@color/main_blue" >
    </RelativeLayout>

</RelativeLayout>
page_base_setting.xml
<?xml version="1.0" encoding="utf-8"?>
<RelativeLayout xmlns:android="http://schemas.android.com/apk/res/android"
    android:layout_width="match_parent"
    android:layout_height="match_parent" >

    <include
        android:layout_width="match_parent"
        android:layout_height="match_parent"
        layout="@layout/page_three_parts" />

    <Button
        android:id="@+id/baseSettingButton"
        android:layout_width="wrap_content"
        android:layout_height="wrap_content"
        android:layout_alignParentBottom="true"
        android:layout_alignParentLeft="true"
        android:layout_marginBottom="32dp"
        android:text="page_base_setting.xml" />

</RelativeLayout>
page_net_settting.xml
<?xml version="1.0" encoding="utf-8"?>
<RelativeLayout xmlns:android="http://schemas.android.com/apk/res/android"
    android:layout_width="match_parent"
    android:layout_height="match_parent" >

    <include
        android:layout_width="match_parent"
        android:layout_height="match_parent"
        layout="@layout/page_base_setting" />

    <Button
        android:id="@+id/netSettingButton"
        android:layout_width="wrap_content"
        android:layout_height="wrap_content"
        android:layout_alignParentBottom="true"
        android:layout_alignParentRight="true"
        android:layout_marginBottom="32dp"
        android:text="page_net_settting.xml" />

</RelativeLayout>
继承式布局在第一个节点处包含父布局文件,然后实现子布局。继承式布局要求父布局和子布局的根布局大小必须一致。至于为什么这么要求,很简单,想一想类继承的特点——子类必须实现父类的所有内容,或者说子类必须能够代替父类。这样的继承方式与我们在C++、C#、Java中实现的继承很不一样,而与GObject、Lua等实现继承的方式很相似。
这种布局方式能够比聚合实现更简单的设计,而且能够更大程度的完成代码和布局的解耦合。这里指的是有很多人会在聚合式布局中留出扩展点,然后在程序运行的时候将内容填充到保留点。这种方式有一个很大的问题,就是只有当程序运行起来之后才能看到页面的完整信息。继承式布局就不存在这样的问题。而且,这种继承关系也完全可以映射到代码类的继承。下面是代码中关于布局的继承关系:
ThreePartsActivity.java
package com.testui;

import android.app.Activity;
import android.os.Bundle;
import android.widget.ImageView;

/**
 * 该类和 page_three_parts.xml 布局文件对应
 */
public class ThreePartsActivity extends Activity {

 /**
 * 布局文件
 */
 protected int layoutRes;

 /**
 * LOGO图片
 */
 protected ImageView imageLogo;

 protected ThreePartsActivity(int layoutRes) {
 this.layoutRes = layoutRes;
 }

 @Override
 protected void onCreate(Bundle savedInstanceState) {
 super.onCreate(savedInstanceState);

 // 设置视图内容
 setContentView(layoutRes);

 imageLogo = (ImageView) findViewById(R.id.image_logo);
 }

}
BaseSettingActivity.java
package com.testui;

import android.os.Bundle;
import android.widget.Button;

/**
 * 该类和 page_base_setting.xml 布局文件对应
 */
public class BaseSettingActivity extends ThreePartsActivity {

 /**
 * 基本配置按钮
 */
 Button baseSettingButton;

 protected BaseSettingActivity(int layoutRes) {
 super(layoutRes);
 }

 @Override
 protected void onCreate(Bundle savedInstanceState) {
 super.onCreate(savedInstanceState);

 baseSettingButton = (Button) findViewById(R.id.baseSettingButton);
 }

}
NetSettingActivity.java
package com.testui;

import android.os.Bundle;
import android.widget.Button;

/**
 * 该类和 page_net_settting.xml 布局文件对应
 */
public class NetSettingActivity extends BaseSettingActivity {

 /**
 * 网络设置按钮
 */
 Button netSettingButton;

 public NetSettingActivity() {
 super(R.layout.page_net_settting);
 }

 @Override
 protected void onCreate(Bundle savedInstanceState) {
 super.onCreate(savedInstanceState);

 netSettingButton = (Button) findViewById(R.id.netSettingButton);
 }

}
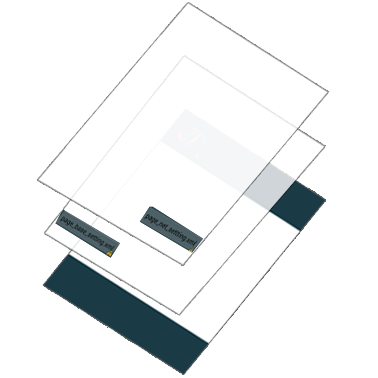
继承式布局实际上是通过布局的层层叠加实现的,但这种叠加是逻辑上的,而不是渲染层次的。所以在实际运行中不会带来太大的性能问题。下面这张图应该能够将继承式布局形象的展示出来:
郑重声明:本站内容如果来自互联网及其他传播媒体,其版权均属原媒体及文章作者所有。转载目的在于传递更多信息及用于网络分享,并不代表本站赞同其观点和对其真实性负责,也不构成任何其他建议。


