
iOS传值-NSNotification
浏览数:30 /
时间:2015年06月11日
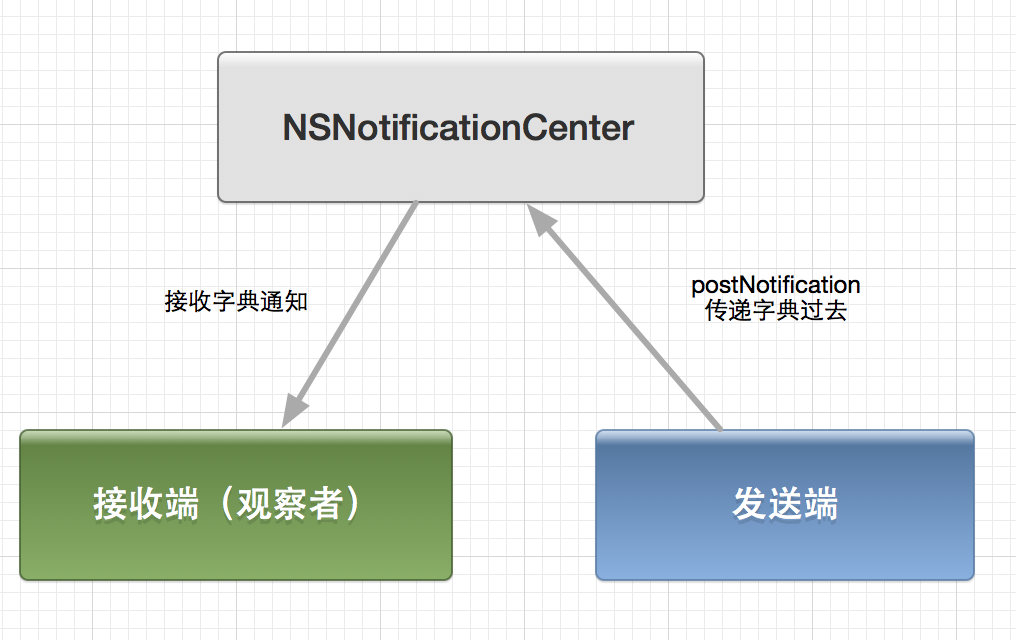
说明:通知在页面传值中,通知是非常简单便捷的方式,具体过程是,发布者发布通知到通知中心,订阅者从发布中心获得最新通知,具体结构如下图
实现代码:
1,新建Single View Application工程,新建一个SecondViewController,用于作为发送端
2,在ViewController.m中添加UIButton用于跳转到SecondViewController,UILabel用于显示通知
@interface ViewController (){
    UILabel *_label;
}
@end

@implementation ViewController

- (void)viewDidLoad {
    [super viewDidLoad];
    //添加UIButton,用于跳转到SecondViewController
    UIButton *btn = [[UIButton alloc] initWithFrame:CGRectMake(20, 200, 300, 44)];
    [btn setTitle:@"ToSecondViewController" forState:UIControlStateNormal];
    btn.backgroundColor = [UIColor grayColor];
    [btn addTarget:self action:@selector(toSecondViewController) forControlEvents:UIControlEventTouchUpInside];
    [self.view addSubview:btn];

    //添加UILabel,用于显示SecondViewController传过来的值
    _label = [[UILabel alloc] initWithFrame:CGRectMake(20, 100, 300, 44)];
    _label.backgroundColor = [UIColor yellowColor];
    [self.view addSubview:_label];

}
- (void)toSecondViewController {
    SecondViewController *second = [[SecondViewController alloc] init];
    [self presentViewController:second animated:YES completion:nil];
}
3,在SecondViewController.m中添加UIButton,用于发送通知并且跳回ViewController,UILabel用于输入通知数据
@interface SecondViewController (){
    UITextField *_textField;
}

@end

@implementation SecondViewController

- (void)viewDidLoad {
    [super viewDidLoad];
    self.view.backgroundColor = [UIColor whiteColor];
    //添加一个按钮用于返回ViewController
    UIButton *btn = [[UIButton alloc] initWithFrame:CGRectMake(20, 200, 300, 44)];
    [btn setTitle:@"BackToViewController" forState:UIControlStateNormal];
    btn.backgroundColor = [UIColor blueColor];
    [btn addTarget:self action:@selector(postNotification) forControlEvents:UIControlEventTouchUpInside];
    [self.view addSubview:btn];

    //添加一个UITextField
    _textField = [[UITextField alloc] initWithFrame:CGRectMake(20, 100, 300, 44)];
    _textField.backgroundColor = [UIColor greenColor];
    [self.view addSubview:_textField];
}
4,在SecondViewController.m中实现发送通知方法
- (void)postNotification {

    NSDictionary *dict = [[NSDictionary alloc] initWithObjectsAndKeys:_textField.text,@"test" ,nil];
    //创建通知
    NSNotification *notification =[NSNotification notificationWithName:@"getValue" object:nil userInfo:dict];
    //通过通知中心发送通知
    [[NSNotificationCenter defaultCenter] postNotification:notification];
    [self dismissViewControllerAnimated:YES completion:nil];

}
5,在ViewController.m中注册通知,并且实现注册通知方法
#import "ViewController.h"
#import "SecondViewController.h"

@interface ViewController (){
    UILabel *_label;
}
@end

@implementation ViewController

- (void)viewDidLoad {
    [super viewDidLoad];
    //添加UIButton,用于跳转到SecondViewController
    UIButton *btn = [[UIButton alloc] initWithFrame:CGRectMake(20, 200, 300, 44)];
    [btn setTitle:@"ToSecondViewController" forState:UIControlStateNormal];
    btn.backgroundColor = [UIColor grayColor];
    [btn addTarget:self action:@selector(toSecondViewController) forControlEvents:UIControlEventTouchUpInside];
    [self.view addSubview:btn];

    //添加UILabel,用于显示SecondViewController传过来的值
    _label = [[UILabel alloc] initWithFrame:CGRectMake(20, 100, 300, 44)];
    _label.backgroundColor = [UIColor yellowColor];
    [self.view addSubview:_label];


    //注册通知
    [[NSNotificationCenter defaultCenter] addObserver:self selector:@selector(getNotification:) name:@"getValue" object:nil];

}
- (void)toSecondViewController {
    SecondViewController *second = [[SecondViewController alloc] init];
    [self presentViewController:second animated:YES completion:nil];
}

//实现注册通知方法,给label赋值
-(void)getNotification:(NSNotification*)notification{

    NSDictionary *dict = [notification userInfo];
    _label.text = [dict objectForKey:@"test"];

}
@end
源码地址:https://github.com/rokistar/PassValueUsingNotification
郑重声明:本站内容如果来自互联网及其他传播媒体,其版权均属原媒体及文章作者所有。转载目的在于传递更多信息及用于网络分享,并不代表本站赞同其观点和对其真实性负责,也不构成任何其他建议。


