CentOS7设置系统/yum以及firefox web代理上网
一.系统全局的代理设置;
用vi/vim编辑器打开/etc/profile,追加如下内容:
http_proxy=http://192.168.78.124:8080
ftp_proxy=http://192.168.78.124:8080
export http_proxy
export ftp_proxy
如果需要输入账号和密码,则追加的内容如下:
http_proxy=http://username:[email protected]:8080 ftp_proxy=http://username:[email protected]:8080 export http_proxy export ftp_proxy
另外,如果不想做全局配置,只为某一用户配置,例如root,则可以将上述内容之一配置追加到/root/.bash_profile
二.yum的代理设置;
用vi/vim编辑器打开/etc/yum.conf,追加如下内容:
http_proxy=http://192.168.78.124:8080
ftp_proxy=http://192.168.78.124:8080
或者:
http_proxy=http://192.168.78.124:8080
ftp_proxy=http://192.168.78.124:8080
proxy_username=username
proxy_password=password
另外,ubuntu的OS apt-get代理联网设置可以用如下方法:
echo ‘Acquire::http::proxy “http://192.168.78.124:8080”;‘ > /etc/apt/apt.conf
三.wget的代理设置;
用vi/vim编辑器打开/etc/wgetrc,找到代理设置所在行,然后追加如下内容:
# You can set the default proxies for Wget to use for http, https, and ftp.
# They will override the value in the environment.
#https_proxy = http://proxy.yoyodyne.com:18023/
#http_proxy = http://proxy.yoyodyne.com:18023/
#ftp_proxy = http://proxy.yoyodyne.com:18023/
http_proxy=http://192.168.78.124:8080/
ftp_proxy=http://192.168.78.124:8080/
说明:如果需要设置用户名和密码,依照上述格式即可。
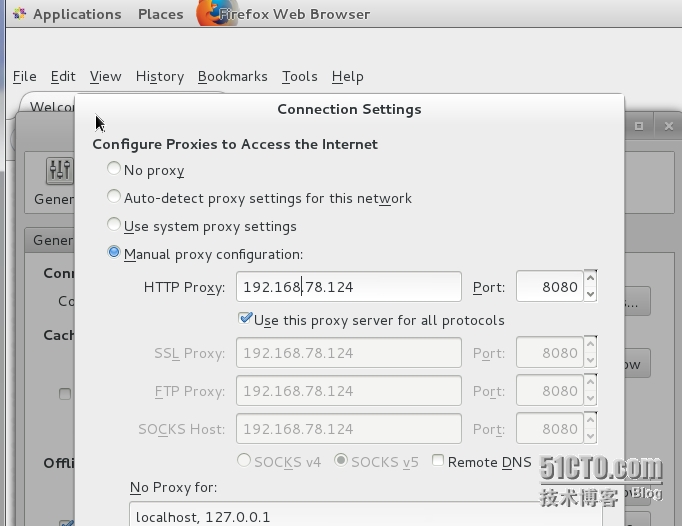
四.firefox浏览器代理联网设置;
说明:设置路径,Edit--> Preferences-->Advanced-->Network-->Settings.
五.附注
192.168.78.124为代理联网服务器IP地址;
8080为自定义端口号。
End.
本文出自 “冯学伟的博客” 博客,请务必保留此出处http://hsuehwee.blog.51cto.com/10114119/1632253
郑重声明:本站内容如果来自互联网及其他传播媒体,其版权均属原媒体及文章作者所有。转载目的在于传递更多信息及用于网络分享,并不代表本站赞同其观点和对其真实性负责,也不构成任何其他建议。


