ASP.NET MVC4+BootStrap 实战(八)
今天西安下雪了,贼冷,我去。今年的年终奖还没发,都快揭不开锅了。
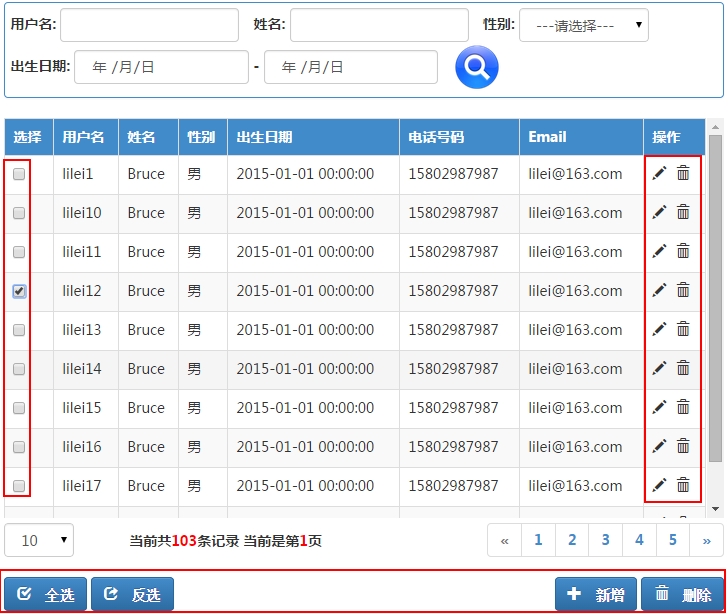
今天的话我们来看一下用户删除和修改,天太冷,先调一下胃口,上图,无图无真相。
看到了吧,新增了选择列,操作列,以及页面最下面的全选,反选,新增,删除按钮。
我们先来看一下全选反选吧,经过修改之后,我们的Table变成如下的代码
<table class="table table-bordered table-striped table-hover" ng-init="load()">
                <tr style="background-color: #428bca; color: white">
                    <th>选择</th>
                    <th>用户名</th>
                    <th>姓名</th>
                    <th>性别</th>
                    <th>出生日期</th>
                    <th>电话号码</th>
                    <th>Email</th>
                    <th>操作</th>
                </tr>
                <tr ng-repeat="userEntity in userEntityList">
                    <td><input id="chk_{{userEntity.UserID}}" type="checkbox" ng-model="userEntity.IsChecked" /></td>
                    <td>{{userEntity.UserID}}</td>
                    <td>{{userEntity.UserName}}</td>
                    <td>{{userEntity.UserSex}}</td>
                    <td>{{userEntity.UserBirthDay.slice(6,-2)|date:‘yyyy-MM-dd HH:mm:ss‘}}</td>
                    <td>{{userEntity.UserPhone}}</td>
                    <td>{{userEntity.UserEmail}}</td>
                    <td>
                        <span style="cursor:pointer;" data-toggle="modal"
                              data-target="#userModifyModal" class="glyphicon glyphicon-pencil span-grid"></span>
                        <span style="cursor:pointer;margin-left:5px;" ng-click="deleteUser(userEntity.UserID)" class="glyphicon glyphicon-trash span-grid"></span>
                    </td>
                </tr>
            </table>
选择列,我们绑定CheckBox是否选中的model为userEntity.IsChecked,这样如果数据源中的IsChecked变量发生变化,checkBox是否选中的状态也会发生变化。以前在使用jquery的时候,我们的做法是取出第一列的所有checkbox,然后设置其属性checked为true。现在有了angularjs,一切都像Silverligt一样简单。OK,我们绑定好了,看一下全选反选按钮的代码
<div class="col-md-4">
                <button type="button" class="btn btn-primary" ng-click="selectAll()">
                    <span class="glyphicon glyphicon-check" title="全选" aria-hidden="true">
                        <label>全选</label>
                    </span>
                </button>
                <button type="button" class="btn btn-primary" ng-click="inverseSelect()">
                    <span class="glyphicon glyphicon-share" title="反选" aria-hidden="true">
                        <label>反选</label>
                    </span>
                </button>
            </div>
在点击全选按钮的时候,我们调用selectAll方法,我们来看一下这个js方法。
$scope.selectAll = function () {
                angular.forEach($scope.userEntityList, function (value, key) {
                    value.IsChecked = true;
                });
            };
看到了吧,就是它,我们只需要循环数据源,设置每个json对象的IsChecked属性为true即可,我们根本不用像jquery那样关心html元素是什么。
那么反选的代码也就大同小异了,如下
$scope.inverseSelect = function () {
                angular.forEach($scope.userEntityList, function (value, key) {
                    value.IsChecked = !value.IsChecked;
                });
            };
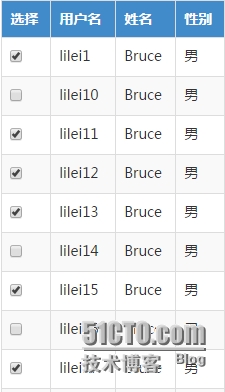
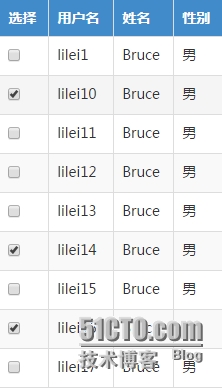
还是循环,把选中的改为没选中,把没选中的改为选中,如下是全选反选的效果。
OK,全选反选算是完了,那么我们接下来当然是要看新增和删除了。新增其实没什么,就是把用户注册界面替换到div_content层。
<div class="col-md-8" style="text-align:right">
                <button type="button" class="btn btn-primary" ng-click="redirectToUserCreate()">
                    <span class="glyphicon glyphicon-plus" title="新增" aria-hidden="true">
                        <label>新增</label>
                    </span>
                </button>
                <button type="button" class="btn btn-primary" ng-click="userDelete()">
                    <span class="glyphicon glyphicon-trash" title="删除" aria-hidden="true">
                        <label>删除</label>
                    </span>
                </button>
            </div>
点击新增,调用redirectToUserCreate方法。
$scope.redirectToUserCreate = function () {
                $http.get("/Home/UserCreateView").success(function (data) {
                    $("#div_content").html(data);
                });
            };
点击删除,就是对批量选择的用户信息的删除,我们看一下userDelete方法。
var chooseUserID = [];
            $scope.userDelete = function () {
                chooseUserID = [];
                angular.forEach(
                    $filter(‘filter‘)($scope.userEntityList, { IsChecked: true }),
                    function (v) {
                        chooseUserID.push(v.UserID);
                    });

                if (chooseUserID.length == 0) {
                    alert("请选择要删除的数据!");
                    return;
                }

                if (confirm("您确定要删除吗?")) {
                    var param = { requestJson: JSON.stringify({ userIDs: chooseUserID }) };
                    userDelete(param);
                }
            };

            function userDelete(param) {
                $http({
                    method: "Delete",
                    url: "/UserManage/DeleteUser",
                    headers: { ‘Content-Type‘: ‘application/x-www-form-urlencoded‘ },
                    data: $.param(param)
                }).success(function (data, status, headers, config) {
                    alert(data.msg);

                    if (data.suc == 1) {
                        $scope.getDatabyPageSize();
                    }
                }).error(function (data, status, headers, config) {
                    alert(status);
                });
            }
我们使用angular的过滤器,将userEntityList中IsChecked的所有用户的UserID放到一个数组中。如果用户确定要删除的话,我们构造一个json对象参数,调用userDelete。在userDelete方法中,我们发送ajax请求,访问DeleteUser这个后台action。如果删除成功,会根据当前页面选择的条件重新查数据。
我们看一下后台的代码
[HttpDelete]
        public JsonResult DeleteUser()
        {
            string requestJson = Request["requestJson"];
            string[] userIDArray = JsonBuilder.BuildUserIDs(requestJson);
            int suc = UserInfoBiz.GetInstance().DeleteUser(userIDArray);

            if (suc >= 0)
            {
                return GetJsonMessage("CM_002", JsonMsgType.SUCCESS);
            }

            return GetJsonMessage("CM_005");
        }
只有verb为Delete的请求才能访问这个action。拿到请求request参数后,反序列化得到一个数组。
public static string[] BuildUserIDs(string requestJson)
        {
            JObject jObj = (JObject)JsonConvert.DeserializeObject(requestJson);
            JToken jToken = jObj["userIDs"];
            return jToken.Values<string>().ToArray();
        }
将得到的UserID拼成以逗号隔开的参数传递到DAL层。
public int DeleteUser(string[] userIDArray)
        {
            if (userIDArray == null || userIDArray.Length == 0) return 1;

            string userIDs = string.Join(",", userIDArray);
            return UserInfoDAL.GetInstance().DeleteUser(userIDs);
        }
DAL层调用sqlScript进行处理
public int DeleteUser(string userIDs)
        {
            try
            {
                string sqlScript = DBScriptManager.GetScript(this.GetType(), "DeleteUserByIDs");
                SqlParameter[] sqlParameters =
                {
                    new SqlParameter("@UserIDs",SqlDbType.VarChar,4000)
                };

                sqlParameters[0].Value = userIDs;
                return SqlHelper.ExecuteNonQuery(ConstValues.CON_DBConnection, CommandType.Text, sqlScript, sqlParameters);
            }
            catch (Exception ex)
            {
                LogHelper.WriteExceptionLog(MethodBase.GetCurrentMethod(), ex);
                return -1;
            }
        }
我们看一下脚本的处理
<Script Key="DeleteUserByIDs">
    <![CDATA[
DECLARE @UserIDTable TABLE
(
	UserID VARCHAR(15) NOT NULL
)

INSERT INTO @UserIDTable
(
	UserID
)
SELECT short_str
FROM dbo.F_SQLSERVER_SPLIT(@UserIDs,‘,‘)

DELETE a FROM dbo.InformationUser a
WHERE EXISTS(
  SELECT TOP 1 1
  FROM @UserIDTable b
  WHERE a.UserID = b.UserID
)
    ]]>
  </Script>
将传进来的UserIDs用函数分割后插入临时表,再删除,OK,删除和新增就结束了。
接下来我们再看table中的操作列单个删除和修改,先看单个删除。
<td>
                        <span style="cursor:pointer;" data-toggle="modal"
                              data-target="#userModifyModal" class="glyphicon glyphicon-pencil span-grid"></span>
                        <span style="cursor:pointer;margin-left:5px;" ng-click="deleteUser(userEntity.UserID)" class="glyphicon glyphicon-trash span-grid"></span>
                    </td>
我们在点击单个删除的时候,调用deleteUser,并将当前行的用户名传到js方法中。
$scope.deleteUser = function (userID) {
                if (confirm("您确定要删除吗?")) {
                    chooseUserID = [];

                    chooseUserID.push(userID);
                    var param = { requestJson: JSON.stringify({ userIDs: chooseUserID }) };
                    userDelete(param);
                }
            };
其实和批量删除调用的是一个js function,再看一下修改。
点击修改Span的时候,有个data-target="#userModifyModal",其实这里是弹出BootStrap的一个modal页面,userModifyModal其实是modal页面div的id。modal页面目前还没做好,不过可以先贴代码出来。
<div class="modal fade" id="userModifyModal" role="dialog"
data-backdrop="static" data-keyboard="false"
aria-labelledby="userModifyModalElement" aria-hidden="true">
<div class="modal-dialog" style="width:450px">
<div class="modal-content" style="width:450px">
<div class="modal-header modal-head">
<button type="button" class="close"
data-dismiss="modal" aria-hidden="true">
×
</button>
<h4 class="modal-title" id="userModifyModalElement">
<img src="../../Images/Base/useradd.png" class="img-panel-title" />
<label>用户信息修改</label>
</h4>
</div>
<div class="modal-body">
<div class="form-group">
<div class="row">
<label class="col-md-2 control-label">姓名:</label>
<div class="col-md-10 col-sm-5-pad">
<input name="userName"
type="text"
maxlength="10"
ng-model="userInfo.userName"
class="form-control"
data-toggle="tooltip"
data-placement="right"
title="姓名不能超过10个汉字" required>
</div>
</div>
</div>
<div class="form-group">
<div class="row">
<label class="col-md-2 control-label">
性别:
</label>
<div class="col-md-10 col-sm-5-pad">
<div class="radio-inline">
<label>
<input ng-model="userInfo.sex" ng-checked="true" name="radioSex" type="radio" value="1">男
</label>
</div>
<div class="radio-inline">
<label>
<input name="radioSex" type="radio" value="0">女
</label>
</div>
</div>
</div>
</div>
<div class="form-group">
<div class="row">
<label for="disabledSelect" class="col-md-2 control-label">
生日:
</label>
<div class="col-md-10 col-sm-5-pad">
<input disabled id="txtBirthDay" ng-model="userInfo.birthDay" type="date" class="form-control" required />
</div>
</div>
</div>
<div class="form-group">
<div class="row">
<label class="col-md-2 control-label">
Emai:
</label>
<div class="col-md-10 col-sm-5-pad">
<input type="email" maxlength="30" ng-model="userInfo.email" class="form-control" id="txtEmail" data-toggle="tooltip"
data-placement="right" title="请填写正确的邮箱地址,用于找回密码等" required>
</div>
</div>
</div>
<div class="form-group">
<div class="row">
<label class="col-md-2 control-label">
电话:
</label>
<div class="col-md-10 col-sm-5-pad">
<input type="tel" maxlength="15" ng-model="userInfo.telPhone" class="form-control" id="txtTelNo" data-toggle="tooltip"
data-placement="right" pattern="^\d{11}$" title="只能输入11位手机号码" required>
</div>
</div>
</div>
</div>
<div class="modal-footer">
<button type="button" class="btn btn-primary">
<span class="glyphicon glyphicon-check" aria-hidden="true">
<label>保存</label>
</span>
</button>
<button type="button" ng-click="windowClose()" class="btn btn-danger">
<span class="glyphicon glyphicon-off" aria-hidden="true">
<label>关闭</label>
</span>
</button>
</div>
</div><!-- /.modal-content -->
</div>
</div>需要注意的是下面的这段
"userModifyModal" role="dialog"
         data-backdrop="static" data-keyboard="false"
         aria-labelledby="userModifyModalElement" aria-hidden="true">
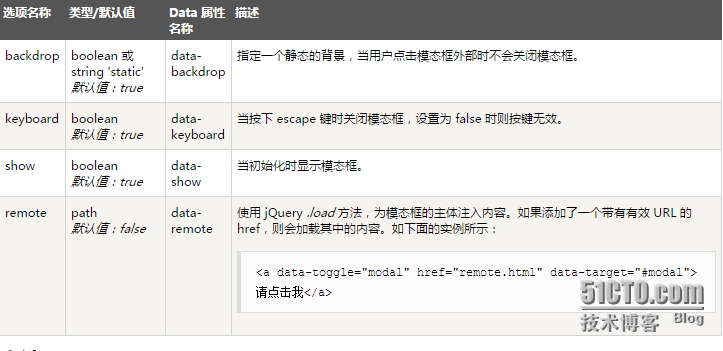
data-backdrop和data-keyboard,官方解释如下
所以我们的设置意思是,点击modal页面以外的地方,modal页不关闭。按esc键,也不退出。
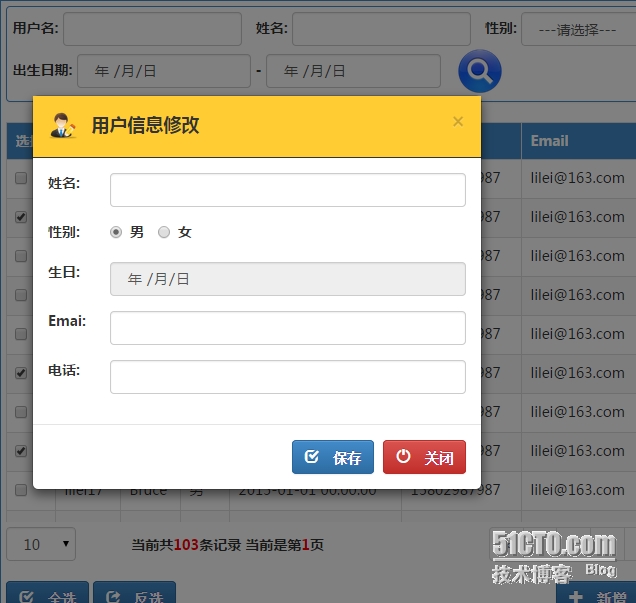
OK,我们看一下效果
默认情况下,modal页面的宽度为600。所以我们修改了其宽度,需要修改如下两个div。
 <div class="modal-dialog" style="width:450px">
     <div class="modal-content" style="width:450px">
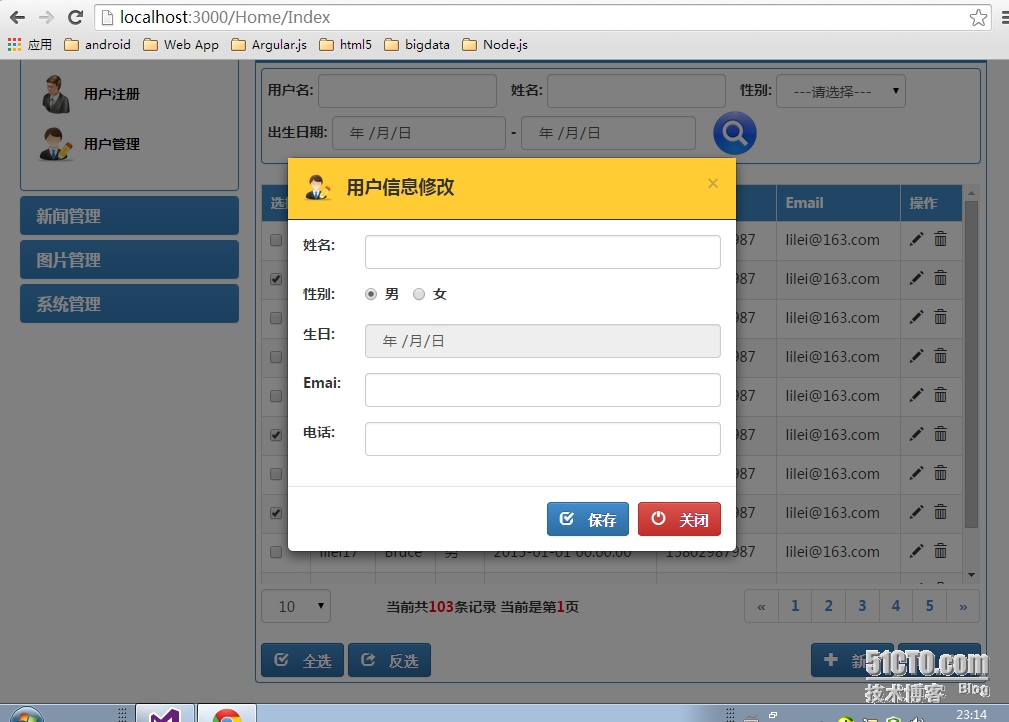
但是这样的话,我们的modal无法垂直居中,那么我们就需要写如下的一段js脚本。
$("#userModifyModal").on(‘show.bs.modal‘, function (e) {
            $(this).find(‘.modal-dialog‘).css({
                ‘margin-top‘: function () {
                    var modalHeight = $("#userModifyModal").find(‘.modal-dialog‘).width();
                    return $(window).height() / 2 - modalHeight / 2;
                }
            });
        });
这样每次弹出来都是居中的,如下。
OK,最后,大家应该看到这个显眼的红色关闭按钮,是如何实现关闭的呢
$scope.windowClose = function () {
                angular.element(‘#userModifyModal‘).modal(‘hide‘);
            };
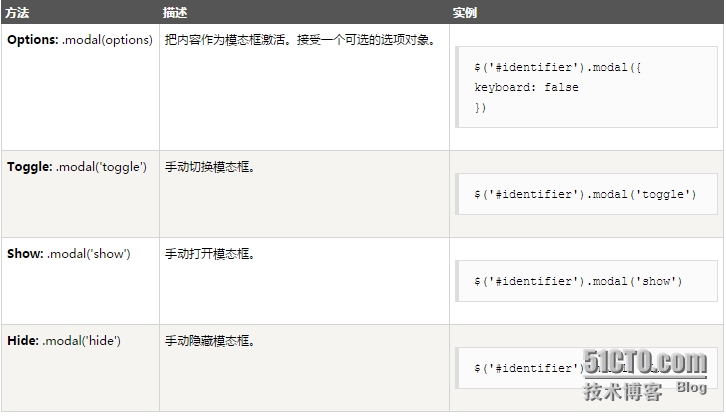
很简单,hide就行了,以下是w3cschool列出的方法
OK,本篇到此结束。
本文出自 “技术创造价值” 博客,请务必保留此出处http://leelei.blog.51cto.com/856755/1609373
郑重声明:本站内容如果来自互联网及其他传播媒体,其版权均属原媒体及文章作者所有。转载目的在于传递更多信息及用于网络分享,并不代表本站赞同其观点和对其真实性负责,也不构成任何其他建议。


