
iOS学习之 plist文件的读写
在做iOS开发时,经经常使用到到plist文件, 那plist文件是什么呢? 它全名是:Property List,属性列表文件,它是一种用来存储串行化后的对象的文件。属性列表文件的扩展名为.plist ,因此通常被称为 plist文件。文件是xml格式的。
Plist文件通经常使用于储存用户设置,也能够用于存储捆绑的信息
我们创建一个项目来学习plist文件的读写。
1、创建项目Plistdemo
项目创建之后能够找到项目相应的plist文件,打开例如以下图所看到的:
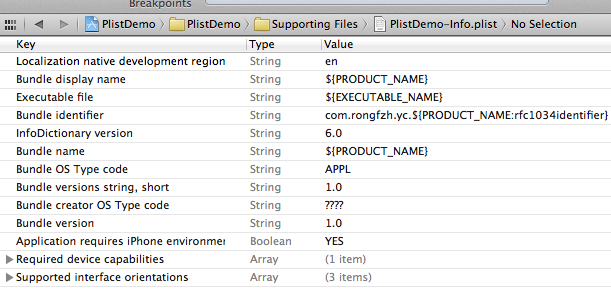
在编辑器中显示相似与表格的形式,能够在plist上右键,用源代码方式打开,就能看到plist文件的xml格式了。
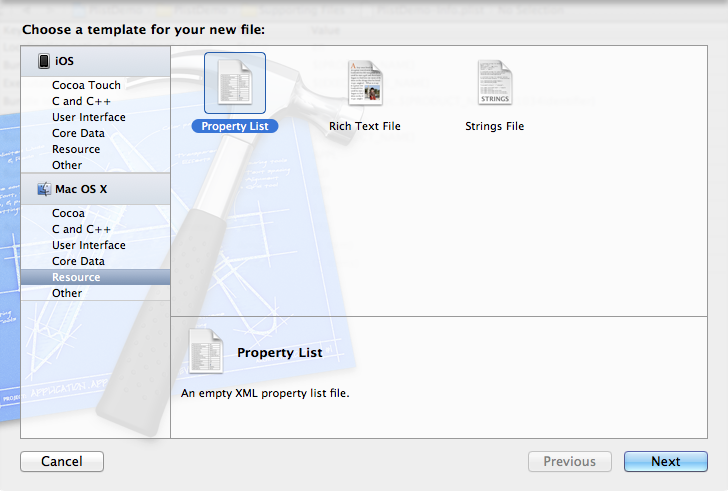
2、创建plist文件。
按command +N快捷键创建,或者File —> New —> New File,选择Mac OS X下的Property List
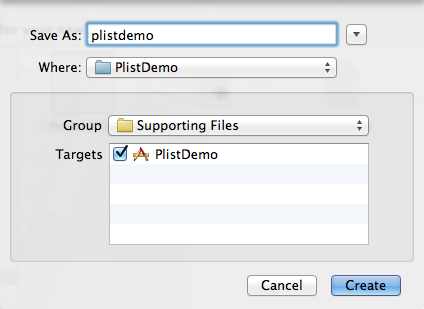
创建plist文件名称为plistdemo。
打开plistdemo文件,在空白出右键,右键选择Add row 加入数据,加入成功一条数据后,在这条数据上右键看到 value Type选择Dictionary。点加号加入这个Dictionary下的数据
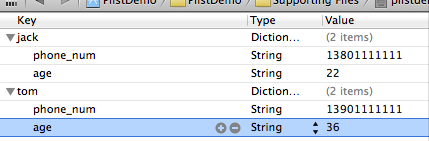
加入完key之后在后面加入Value的值,加入手机号和年龄
创建完毕之后用source code查看到plist文件是这种:
<?xml version="1.0" encoding="UTF-8"?>
<!DOCTYPE plist PUBLIC "-//Apple//DTD PLIST 1.0//EN" "http://www.apple.com/DTDs/PropertyList-1.0.dtd">
<plist version="1.0">
<dict>
	<key>jack</key>
	<dict>
		<key>phone_num</key>
		<string>13801111111</string>
		<key>age</key>
		<string>22</string>
	</dict>
	<key>tom</key>
	<dict>
		<key>phone_num</key>
		<string>13901111111</string>
		<key>age</key>
		<string>36</string>
	</dict>
</dict>
</plist>
3、读取plist文件的数据
- (void)viewDidLoad
{
    [super viewDidLoad];
    //读取plist

    NSString *plistPath = [[NSBundle mainBundle] pathForResource:@"plistdemo" ofType:@"plist"];
    NSMutableDictionary *data = [[NSMutableDictionary alloc] initWithContentsOfFile:plistPath];
    NSLog(@"%@", data);//直接打印数据。
}PlistDemo[6822:f803] {
jack = {
age = 22;
"phone_num" = 13801111111;
};
tom = {
age = 36;
"phone_num" = 13901111111;
};
}这样就把数据读取出来了。
4、创建和写入plist文件
在开发过程中,有时候须要把程序的一些配置保存下来,或者游戏数据等等。 这时候须要写入Plist数据。
写入的plist文件会生成在相应程序的沙盒文件夹里。
接着上面读取plist数据的代码,加入了写入数据的代码,
- (void)viewDidLoad
{
    [super viewDidLoad];
    //读取plist

    NSString *plistPath = [[NSBundle mainBundle] pathForResource:@"plistdemo" ofType:@"plist"];
    NSMutableDictionary *data = [[NSMutableDictionary alloc] initWithContentsOfFile:plistPath];
    NSLog(@"%@", data);

    //加入一项内容
    [data setObject:@"add some content" forKey:@"c_key"];

    //获取应用程序沙盒的Documents文件夹
    NSArray *paths=NSSearchPathForDirectoriesInDomains(NSDocumentDirectory,NSUserDomainMask,YES);
    NSString *plistPath1 = [paths objectAtIndex:0];

    //得到完整的文件名称
    NSString *filename=[plistPath1 stringByAppendingPathComponent:@"test.plist"];
   //输入写入
    [data writeToFile:filename atomically:YES];

    //那怎么证明我的数据写入了呢?读出来看看
    NSMutableDictionary *data1 = [[NSMutableDictionary alloc] initWithContentsOfFile:filename];
    NSLog(@"%@", data1);


	// Do any additional setup after loading the view, typically from a nib.
}
在获取到自己手工创建的plistdemo.plist数据后,在这些数据后面加了一项内容,证明输入写入了。
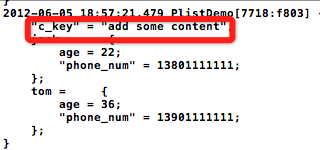
怎么证明加入的内容写入了呢?以下是打印结果:
代码地址:https://github.com/schelling/YcDemo/tree/master/PlistDemo
著作权声明:本文由http://blog.csdn.net/totogo2010/原创,欢迎转载分享。请尊重作者劳动,转载时保留该声明和作者博客链接,谢谢!
郑重声明:本站内容如果来自互联网及其他传播媒体,其版权均属原媒体及文章作者所有。转载目的在于传递更多信息及用于网络分享,并不代表本站赞同其观点和对其真实性负责,也不构成任何其他建议。


